CLICK HERE FOR FREE BLOGGER TEMPLATES, LINK BUTTONS AND MORE! »
Showing posts with label Simply Said. Show all posts

Friday, 30 September 2011

Too late!

Wow, the past few weeks have flown by. I had a few cards featuring retiring products that I wanted to post before the new catalogue went live, but I'm last-minute-Larry as usual! Never mind, I'll be ordering new goodies tomorrow and hope they arrive quickly (I have a NEED for a certain new ribbon ;)) As a demonstrator, I could order some new products early, so I may be giving a little teaser over the next few days to whet your appetite! In the meantime, here's a few I made earlier.


Products used (all Stampin' Up!):
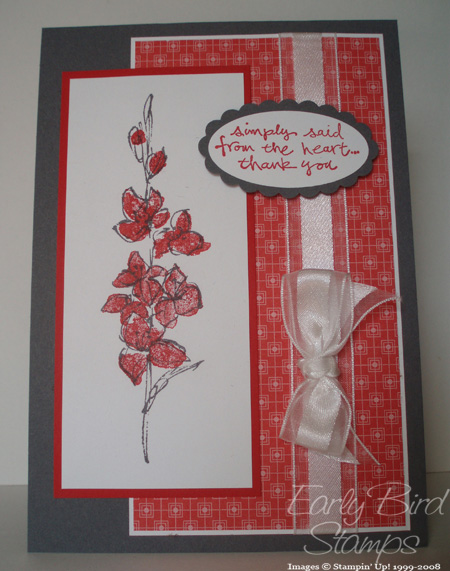
  • Stamps: Fast and Fabulous (hostess L2), Simply Said
  • Ink: Basic Gray, Poppy Parade
  • Cardstock: Basic Gray, Poppy Parade, Whisper White
  • Other: In Colour Designer Paper pack (hostess L1), Large Oval punch, Scalloped Oval punch, White 5/8" Organza ribbon.

Tuesday, 10 February 2009

Another Mojo sketch

I've combined a couple of challenges in the creation of this card: the colours are taken from ILWS colour challenge 17 (Old Olive, So Saffron and Pumpkin Pie) and the layout is from Julee's Mojo Monday (sketch 69). I've also managed to use up some of the lovely designer papers I've been hoarding - these have all now retired and I'm on a mission to use them!

The flowers have been stamped in black Stazon on white cardstock and coloured using a blender pen and inkpads, cut into a circle then matted onto a black cardstock circle. Three panels of designer paper have been added to a black cardstock layer, then added to the white base. Gold brads have been used to attach the felt flowers to a small black circle, which have then been arranged between the two lower blocks of colour. TIP: If you attach the flowers and circles to the main black layer BEFORE it's attached to the white base, then you won't see the 'legs' of the brads inside your card.
I haven't added a sentiment to this yet, and can't decide whether to leave the card without one, or to add one to the white area on the right hand side of the flowers. What do you think?

Products used (all Stampin’ Up!):
  • Stamps – Simply Said
  • Ink – black Stazon, Pumpkin Pie, So Saffron
  • Cardstock – Whisper White, Basic Black
  • Other – Blender pens, Designer Paper (Pumpkin Pie, Old Olive, Petals and Paisley), Felt Flowers (Accents and Elements), Gold brads

Thursday, 8 May 2008

Kickstand card

Here is a slightly different card style for you to try, it is called a kickstand card. The card base is folded at the top and a portion of the bottom of your card front is cut off, then a panel added. The panel can be any shape you like - round, oval, square, or rectangular as seen here.

A piece of Cutie Pie designer paper has been added to the front of the rose red card. The image, stamped in black Stazon on white cardstock, has been coloured using inkpads and a watercolour pen, but markers could also be used. This has been matted onto a piece of banana cardstock, and the bottom edge lined up with the bottom of the card base to ensure the card stands securely. Make sure you don't place any adhesive on the bottom part of the panel or the card won't open - trust me, the voice of experience! The sentiment was stamped in black Stazon on celery cardstock and placed on the kickstand panel.
Products used (all Stampin' Up!):
  • Stamps: Simply Said
  • Ink: black Stazon, Rose Red, Certainly celery
  • Cardstock: Whisper White, Rose Red, Barely Banana, Certainly Celery
  • Other: Cutie Pie designer paper

LinkWithin

Related Posts Plugin for WordPress, Blogger...